Ford Parts Wiki | GM Parts Wiki
Home | Search | Browse
Prev

 Next
Next
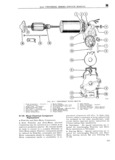
H ELECTRICAL SYSTEM f Remove fastening screws cover plate assembly and gasket O g Remove parking plate and gear assembly h Remove parking brushes spring and bowed O washer from gear assembly i Remove the two through bolts and mounting k O 0 brac et i j Remove the magnet housing armature and end O cap as an assembly Z 14393 k Tap end of armature shaft to loosen end cap FIG H 66 WINDSHIELD WIPER assembly and remove cap from armatnre shaft Be SWITCH ASSEMBLY LATE careful not to lose thrust disc which is in end cap BWBMMY bearing bore j Q Q ggggg I Remove armature from magnet housing Care 3eW 1 f 2 L9 Sr d should be taken to protect armature shaft bearing 4 W1per 2 H1 Speed 5 Parl Ol 1I I 13 ls m Remove brushes and brush spring from brush g If wiper operates erratically check for loose holders wiper ground connection or loose dash switch mountin g H 147 Cleaning of Two Speed Wiper Motor H 145 Wiper TrOub esh ting on Bench a Clean magnet housing and armature with a cloth dampened in cleaning solvent Using ammeter capable of reading at least 30 b T H b d t h ld amperes check feed wire circuit for open circuit h O Owmg carmg eqmhpc par S S Ou not be immersed in cleaning Huidz a If wiper is inoperative connect wiper to operate 1 bl in low speed and observe current draw If the read L COVCY p ahh assem y ing is zero amp check for loose solder connection 2 Gen n0u 1ng a e nblY at wiper terminal or loose splice joints If reading is 3 End cap assembly 1 t0 L5 amp cheek f r 1 armature Sticking The metal surfaces of these assemblies should be brushes 0Y100Se Splice J0 nt If Yending is U nmpn cleaned with a brush dipped in cleaning solvent Cheek fOI breken gear Selzedenaft 0I 0Yne 0tneY making certain that cleaning fluid does not contact condition that will stall the w1per bea mgS b If wir r will mt Shut Off this difi9 may e Clean remaining parts with e brush and cleaning exist if wiper has one or both speeds If wiper has SO V t both speeds check for park switch contacts not opening or internal wiper motor lead that connects to wiper terminal being grounded If wiper has low H 148 Reassembly of Two Speed speed only check for internal wiper motor lead that Wiper Motor connects to wiper terminal being grounded If Refer to Fig H 67 Wlper has high Speed h1Y Check for intefnal Wiper To reassemble motor reverse the steps given in motor lead that connects to wiper terminal be1ng Pan H 146 Onenii When reassembling motor fingers must be clean C If Wiper Crank arm d0e n0t return to Dnfk when handling brushes Hold brushes in the holders position when wiper is turned off check for dirty by applying paper clips to brush shunts Apply a bent t0 broken Park Swlfch 0nt3 t light film of lubricant to armature shaft ends d If wiper operates erratically check for sticky armature worm gear and gear assembly shaft ends brushes or 10Ose splice joints Remove paper clips after assembling armature to S If the wiper will not shut off or wiper crank arm gear n0n ng Angn marks 0n magnet n0uS1ng and fails to stop in park position when jumper wire is gear n0n 1ng Armature end PlaY Should be 002 removed from terminal check that park switch 010 Contacts are opening Also check for ground in in Be Sur t0 0PeYate Wiper te Park Pesltlen PHO to ternal motor lead that connects to terminal installing dmve arm H 146 Disassembly of Two Speed 149 No Load Testing W p r M t Test the motor to meet the following specifications Refer to Fig H 67 a Remove windshield wiper motor cover LOW SPEED HIGH SPEED b Disconnect drive arm from wiper linkage y Ampefe c Disconnect wiring from wiper dash switch Draw Draw d Remove wiper motor R P M Max Max Lools1er drive arm hardware and pry drive off 42 iiir iff 2 75 62 3 y5 rive s a t 218

 Next
Next