Ford Parts Wiki | GM Parts Wiki
Home | Search | Browse | Marketplace | Messages | FAQ | Guest
|
Technical Service Manual January 1975 |
|
Prev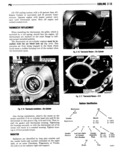
 Next
Next
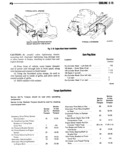
2 14 600LIllIl r NOTE For testing radiator for leaks or pressure loss CAUTION Fans are designed for certain applica see Cooling System Pressure Test tions only DO NOT attempt to increase cooling capacity bg installing a fan not intended for a given Several conditions may affect radiator operation engma Mme lmdfan damage may result Bent or damaged tubes ylnmn MDCK Corrosive deposits restricting coolant flow c Tubes blocked due to improper soldering mmwlng goal mm cmlkuu Damaged tubes which affect proper operation must Should coolant mix with engine oil it will clog the be repaired Leaks can be detected by applying 3 to 5 oil lines and cause the pistons to seize Severe damage psi air pressure to the radiator while it is submerged to the engine will result If coolant has leaked into the in water Tubes shouldberepaired with solder lubricating system locate the cause for the coolant A uluuuuu radiator usually can be cleared by uuuuuuu my guy g 3 my hid gjekrgggjjacked b 0g flushing or by solvent cleaning me e e necessary epa s eqamng Q leak use AMC Crankcase Cleaner or equivalent to flush engine En ln Flusliln emove ermos ousing an ermos saw ummm 1 R U th tat h li th tat Use of a radiator cleaner AMC Radiator Kleen or Replace he m0 8 housing equivalent prior ro flushing will soften scale and 8d 2 Attach flushrns sun to upper radiator hose at deposits r iator en 3 Attach leadaway hose to water pump inlet M FI M mul l 4 Connect water supply hose and air supply line Ulf IS I I Ill toflushinggun 5 Allow engine to fill with water CAUTION The cooling system normally operates at 6 When engine is filled apply air in short blasts 12 to 15 psi pressure Excessive pressure may damage allowing system to fill between air blasts Continue the radiator heater core or hoses until clean water flows through Ieadaway hose T Remove thermostat housing and install ther 1 Disconnect radiator hoses mostat Install thermostat housing Tighten bolts to 13 2 Attach a piece of radiator hose to radiator bot foot pounds torque tom outlet and insert flushing gun 8 Connect radiator hoses 3 Connect water supply hose and air supply line 9 Refill cooling system to flushing gun 4 Allow radiator to fill with water N lI lIIl NIN HIIIS 5 When radiator is filled apply air in short Prior to uhm tankin ul g or block boiling remove cast b ge g r r d g g e Wg H lug flash causing hot uuuu uu coolant llow blockage th Onyx rliverseif tg 1 mg 1 1 csjnlwa rd 0 S Remove core plugs with hammer chisel and prying mug D 0 e uS mg al S c ear ra la or tool Apply a sealer to edges of new plug and install with assa e the radiator will have to be cleaned more ex p g hammer and suitable tool Refer to the core plug size tensively by a radiator repair shop chart for location and Size hnlgr Ihplrg ENGINE BLOCK NEATEN Because of the high pressure in the oil cooler con On engines equipped with an engine block heater ventional soldering will not repair leaks Al repairs the heating element plugs into any standard wall out muggbe gi vpl g d qd or brag let It heats the cicgant which heats the engine parts to provide easier co starting Inslallallun FAN NEPUDEINENT 1 Drain coolant from engine Fan blade assemblies are balanced within 0 25 2 Remove core plug and install block heater fig in oz and should not be altered in any way Refer to 2 18 Tighten six cylinder T bolt to 20 inch pounds the Cooling System Components Chart for fan applica torque Tighten V 8 compression nut to 10 i 0ot pounds tions torque