Ford Parts Wiki | GM Parts Wiki
Home | Search | Browse
|
Technical Service Manual January 1975 |
|
Prev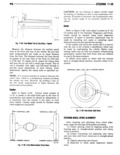
 Next
Next
II 40 STEERING VI F l l WHEEL MY move or appear to be loose in their sockets proceed to step 8 If any stud moves or appears to be loose in is Front wheel shimmy may be caused by one or more of socket reseat both studs on that side of the axle as the following conditions follows Incorrectly adjusted front wheel bearings a Remove wheels and tires Remove axle Worn or out of balance or out of round front shafts tires b Remove cotter pin and slotted nut from up Loose steering damper to tie rod bracket CJ per ball stud and loosen lower ball stud jamnut Cherokee Wagoneer Truck c Unseat upper and lower ball studs by strik Steering damper malfunction ing upper ball stud with rawhide or lead hammer Re Worn loose tie rod ends move upper ball stud split ring seat using Tool Worn loose steering knuckle ball studs J 25158 Discard split ring seat Incorrect tire pressures d Remove lower ball stud jamnut and remove The following procedure outlines a method of cor steering knuckle Discard lower ball studjamnut recting the causes of wheel shimmy e Clean upper ball stud split ring seat 1 Raise and support front of vehicle threads and lower ball stud taper in steering knuckle 2 Inspect condition of front tires Check and cor Clean threads and tapered surfaces of both ball studs rect tire inflation pressure Check for evidence of tire Clean threads in upper ball stud retaining nut imbalance such as flat spots scalloping cupping or f Install steering knuckle Support knuckle bald spots If necessary balance or replace tires by hand and install new lower ball stud jamnut Tigh 3 Check front wheel bearing adjustment Correct ten jamnut finger tight only Install upper ball stud wheel bearing adjustment if necessary Refer to pro nut Tighten nut until lower ball stud is drawn into cedure outlined in Section 9of this manual mpered hole in axle yoke Do not install split ring seat 4 Check for loose steering damper tie rod bracket at this time on vehicles so equipped If bracket is loose center g Tighten upper ball stud jamnut to 80 foot bracket on tie rod and tighten attaching bolts pounds torque Remove upper ball stud nut and install 5 Disconnect steering damper at tie rod bracket W PP F bail stud Split Ying Seat Tighten 5Piii Tin and check operation as follows seat to 50 foot pounds torque using Tool J 25158 Tigh a Alternately compress and extend damper ten lower ball stud jamnut to 100 foot pounds torque Damper should provide equal resistance throughout and install cotter pin length of each strokc h Install axle shafts and steering spindles b Replace damper if lack of resistance is evi and repeat step 7 dent i Install wheels and tires 6 Inspect all tie rod ends If excessive play is 8 On CJ models not equipped with steering dam observed in any tie rod end when checked replace it per if components inspected are 0 K install steering 7 Inspect steering knuckle ball studs Insert pry damper bar between knuckle and yoke adjacent to ball stud 9 Remove supports and lower vehicle and pry against each ball stud If none of the studs 10 Road test vehicle to verify repair Description and Upwatlon 1141 Pnwur Staring Pump S rvlo 11 51 Gmral ll 40 Sarvlu Dlaqnusls 11 I5 Parlulk NI in1 mnc 11 A4 Sp i I1Ic 1Iuns 11 82 Powar S1 rIn Eur Sarvlu ll II Tania 11 114 GENERAL reservoir through the pressure and return hoses which connect the gear and pump The power steering system consists of a power If for any reason the power system should malfunc steering gear connecting hoses and a hydraulic pump tion the steering gear will operate manually giving The engine driven pump supplies oil from its integral the driver continued control of the vehicle The steer