Ford Parts Wiki | GM Parts Wiki
Home | Search | Browse
|
Technical Service Manual January 1975 |
|
Prev

 Next
Next
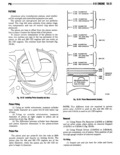
IB 30 ll 8 ENGlNE VI 4 w 1 J t A i js l scAi e r I Tr 5 Ron Amo cvuunes l l i Ol NUMBER l V ro OUTSIDE R Q M et y noi V i 1 0 1 V i msme 5 V i 0 in it E Amen I i i commzssen vusricnce MSW Fin lll 30 llml llumlm and Squln llnlu Lucatlun Flq lll 31 Dnnnccllng llnd Baring Glaaranuu Iinasurlng Journal Slz wltn Mlcruinalcr M wml ll ll 1 Wipe connecting rodjournals clean O I 2 Using a micrometer measure journal diameter at a number of points Note difference between maximum and minimum diameters r 3 Refer to Specifications for maximum allowable taper and out of round If any rod journal is beyond 5 specifications the crankshaft must be replaced or Q reconditioned and fitted with new undersize bearing ll inserts 4 Compare maximum reading obtained with journal diameters listed in bearing fitting chart 5 Select inserts required to obtain 0 002 to 0 0025 R inch bearing clearance Musurlng Bearing Clearance wlln Plasllgaga Q 1 Wipe bearing inserts and rod journal clean 2 Place a strip of Plastigage across full width of l 7A soizv lower insert at center of bearing cap 3 Install bearing cap to connecting rod and tigh HIL Mz cnnnmlnl Md sm mumm Mnunmm ten retaining nuts to 33 foot pounds torque on 304 and 360 CID engines and 39 foot pounds torque on 401 CID engines f f h th 4 Remove bearing cap and determine amount of cleafinlgggfsfe bearing Sur ace 0 em Insert wl gfariimce by hmgisugmg Oilgthf wmpressed 3 Install bearing inserts cap and retaining nuts asugage Wm Sed 8 mms lg 3 Tighten to 33 foot pounds torque on 304 and 360 CID Connxtlng Md sid Clurancn Mgggurgmgm engines and 39 foot pounds torque on 401 CID engines 1 Rotate crankshaft to position connecting rod CAUTION Exercise mm when rotating the cm Joumalat bottom lf Sbr l 9 sha with bearing caps removed Be sure the connect 2 Insert Snug fmmg feeler gauge between com lug rod bolts do not accidentally come in contact with nectmg r dS g B 32 the rod journals and scratch the finish which can 3 C p F fee er gauge measumlrleni to cause bearing failure Use of rubber hose on rod bolts clearance specified Replace rods not to Specifications is Tecommended to pmvwt damage to mdjourmlsl Insmhuun 4 Install oil pan using new gaskets and seals 1 Rotate crankshaft to position connecting rod Tighten drain plugsecurely journal at bottom of stroke 5 Fill crankcase to specified level with new oil