Ford Parts Wiki | GM Parts Wiki
Home | Search | Browse
|
Technical Service Manual January 1975 |
|
Prev

 Next
Next
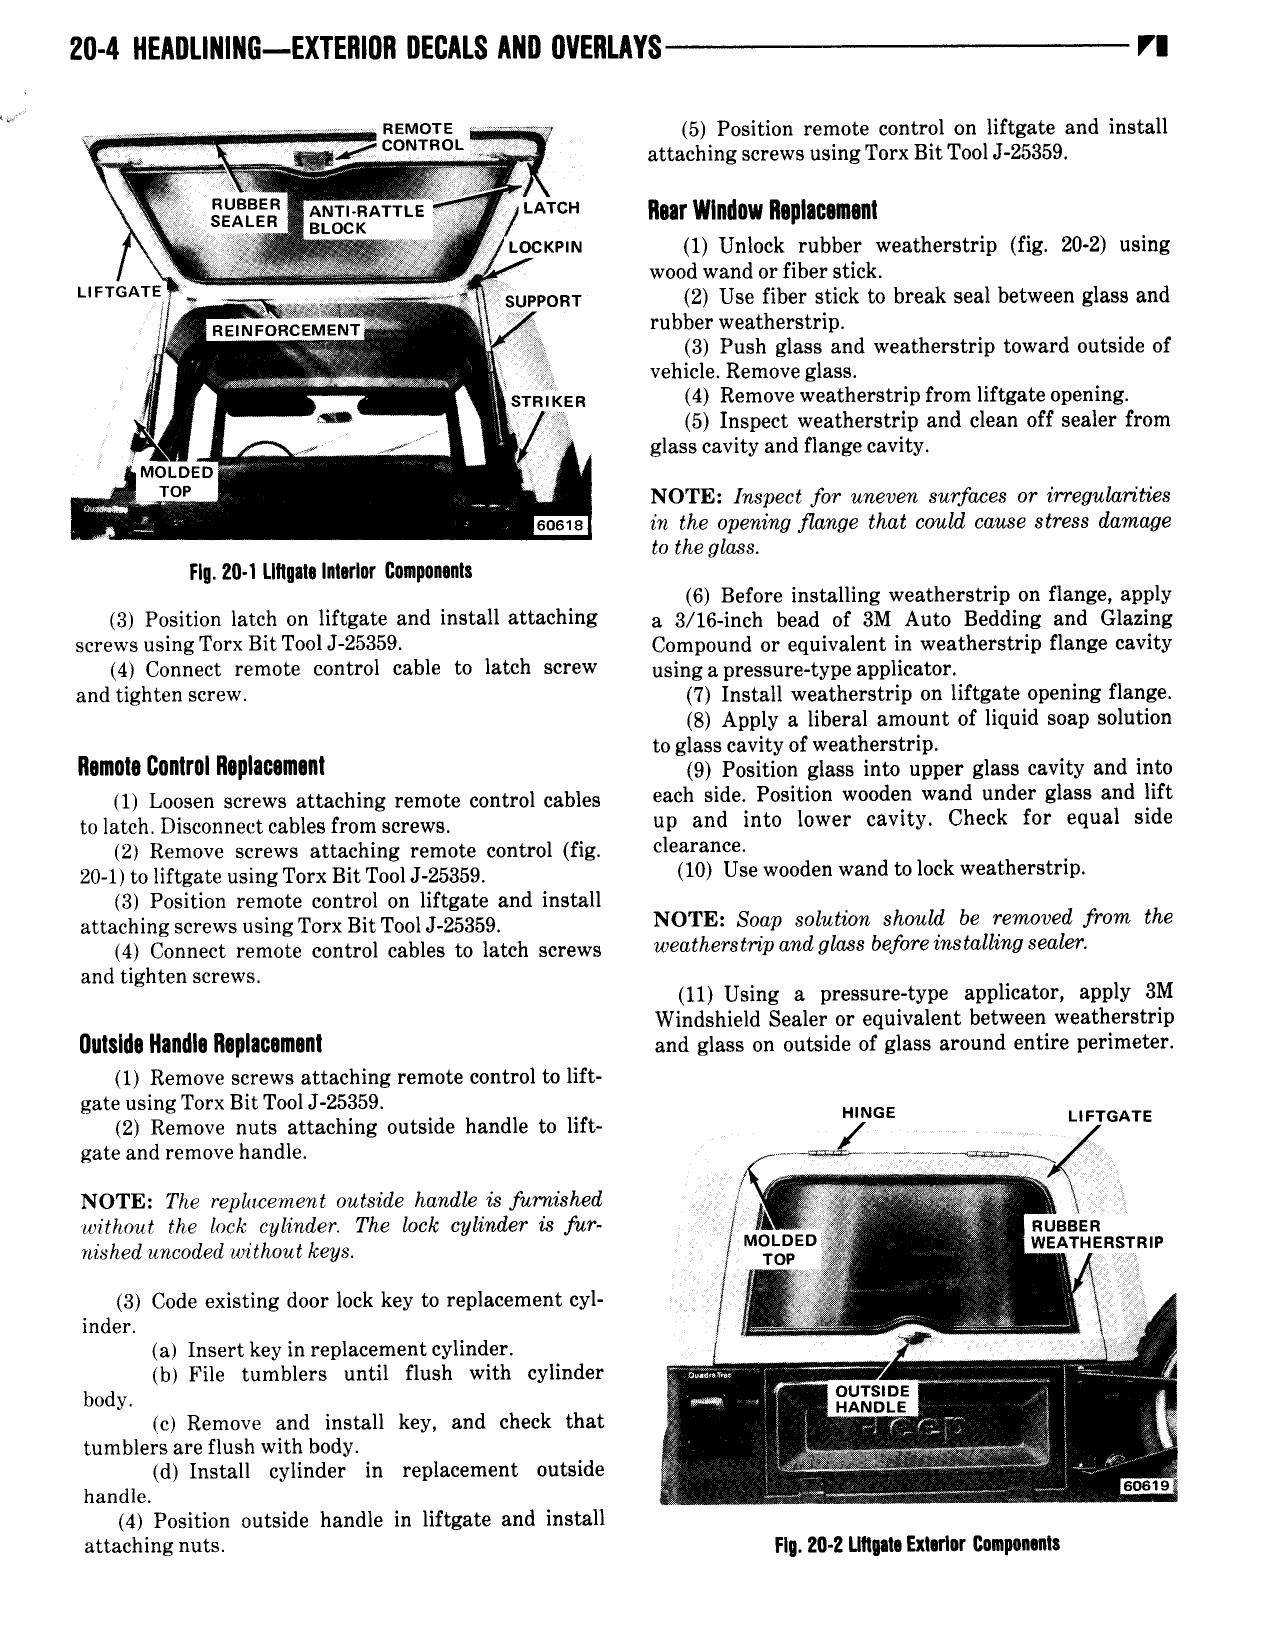
20 4 IlEIlllL lllll0 EXTEllI0ll DEDALS ANI 0llElllAYS VI Ai W REMUTE or rc 5 Position remote control on liftgate and install Az CONT attaching screws usingTorx BitT0olJ 25359 4 g op f syggserrie LATCH rvllndow llaplstomnl ie sn tocxvnu 1 Unlock rubber weatherstrip fig 20 2 using i i wood wand or fiber stick UFTGATE V W V suvvom 2 Use fiber stick to break seal between glass and nslnnooos sm w rubber weatherstrip 3 Push glass and weatherstrip toward outside of I vehicle Remove glass i Y synikss 4 Remove weatherstrip from liftgate opening Q 5 Inspect weatherstrip and clean off sealer from V no V glass cavity and flange cavity Motoen NOTE Inspect for uneven surfaces or irregularities s sosis in the opening flange that could cause stress damage to the glass FI 20 1 Llltuaia lmrlnw Cunpanma 6 Before installing weatherstrip on flange apply 3 Position latch on liftgate and install attaching n 3 ig innn bond of 3M Auto Bonding and Glazing SCTSWS 1Si ET0l X Bit T00l l 25359 Compound or equivalent in weatherstrip flange cavity 4 Connect remote control cable to latch screw nsjngopnossui o typo applioami and tighten screw 7 Install weatherstrip on liftgate opening flange 8 Apply a liberal amount of liquid soap solution to glass cavity of weatherstrip naman cnntrnl llaplammunl io Position giooo imo upper giass cavity and into 41 Loosen snows smashing remote conn ol cables each side Position wooden wand under glass and lift to ima Disconnect cables from screws up and intv lower cevitw Check fer equal side 2 Remove screws attaching remote control fig clearance I 20 1 to liftgate using Torx Bit Tool J 25359 10 Use wooden wand to lock weatherstrip 3 Position remote control on liftgate and install attaching screws using Torx Bit Tool J zssso N0TE Sow Svlufwn Shw 4 be termed from me 4 Connect remote control cables to latch screws w th l WlP mdQl 7 b f Metallica Sealen and tighten screws 11 Using a pressure type applicator apply 3M Windshield Sealer or equivalent between weatherstrip lIIl8l00 llllllill Rlpllllllllllll and glass on outside of glass around entire perimeter 1 Remove screws attaching remote control to lift gate using Torx Bit Tool J 25359 HINGE 2 Remove nuts attaching outside handle to lift UFTGATE gate and remove handle 74 A 4 r NOTE The replacement outside handle is furnished i n i i without the loc r cylinder The lock cylinder is fur A nusasn nished uncoded unthout keys M2 I ED WEATHERSTRW 3 Code existing door lock key to replacement cyl j I inder ieee o s w a Insert key in replacement cylinder b File tumblers until flush with cylinder s V A V i M my Sklilf i c Remove and install key and check that I r r tumblersare flush with body 7 sr d Install cylinder in replacement outside I i r T J handle 4 Position outside handle in liftgate and install attaching nuts Fly 20 Z Llll t Exl rl r llclpnvnlt

 Next
Next